Pages

Friday, February 25, 2011

Handmade Chore Charts

After weeks of disagreeing with my daughter over rules and repeating myself ... as parents often do ... I decided it was time to introduce some charts for my girl.  The idea was to put them up on the wall as a reminder for her that there are house rules, routines and chores to be done.

So this is what i've been working on for the past couple of days.  I had to think about how I was going to put this together as I didnt want to use the traditional gold stars.  We find them a little boring in this house.  So naturally I reached for my tub of fabric scraps and put some pretty tabs together that she can put on and take off herself.


this is one of the tabs.  


To make them I got myself a piece of fairly thick cardboard and something circular I could trace around to make my desired size.  I didn't want them too big, so I used the bottom of a small medicine cup.

After tracing out my circles and cutting them out, each one was then wrapped with a peice of fabric.  I placed each circular card on the fabric and cut a square shape around my circle - just so I wasn't dealing with too much material.  Once sized up, I took my glue (tiger grip) and glued each peice as I folded it in at the back.


really it's just a matter of fold and glue until all your edges are all glued in nicely.

Once thats complete I allowed them to dry over night, just to make sure it was well and truely set.

I got myself some velcro - I thought this would be the easiest for her to stick and peel.  So I cut some small pieces of the velcro that would fit nicely to the back of each circle.  I seperated the two peices (fluffy and spikey) and I glued the spikey side to the back of my circle.  And put the fluffly piece aside until I was ready to glue to the card.

this is what they are looking like at this stage ...


I also made sure I used a glue that dries clear.  And I used lots of different coloured material to make it fun for my daughter.

So that was the hardest part of the whole project ... not difficult at all really.  When I'd finished, I went onto drafting up my chore lists and wrote them up on three peices of cardboard - different colours of course.

To set up the place for each tag I simple glued the 'fluffy' piece of velcro at the end of each chore/item, etc and allowed it plenty of time to dry.

here is some with just the velcro stuck on and with some tabs pressed in place - so you can see how i've attached them.

so, you can see that i've worked my way down the items adding a tab to each.  The idea of this is for your child to put a tab on when the task is complete.


this is the other chart I was working on simultaneously.  I created a little pocket at the bottom as a storage for all the tabs.

my daughter giving it a test run ... 
And its a hit!!! ... thanks mum!

My daughter loves her new charts and couldn't wait to have a go at sticking her pretty fabric tabs on.


I hope you have enjoyed our way of spicing up and making chores fun for the kids.

See you again soon ...


Tea for two

I have to share with you all this gorgeous little place I discovered yesterday in town.  Its called 'The Tea Club' and it is so quaint ... like stepping into another world where fairies dance and magic surrounds.  I can't believe I have lived here for a year and have never been into this place!

After spending a soothing couple of hours sitting in the garden having tea the rest of the world just drifted away.  It really was like being in another world.  The energy in the garden really was like being in a magical fairy garden.  Just what I needed!

After ordering the most delicious baked cheesecake I was served a beautiful chai tea with the most incredible teapot.  I have to show you this teapot because I just loved it so much.  The were really quite heavy, but oh so special.

They tell me that you can actually purchase these from The Tea Club ... I believe they will soon be making another sale :) or two .. or three .. or four ..


isn't it devine!!


and here's our little tea party ...


this is some of the garden ...


this lamp post reminded me of the one from The Lion the Witch and the Wardrobe .... 


it just seemed to have the same magical energy


So that was the highlight of my week.  A beautiful tea party in a beautiful and magical garden that I will definately visit again soon ...


Saturday, February 19, 2011

A Mixed Bag

Well it's been quite a busy day in this household.  My day started out pretty well ... I got stuck into some sewing.  I was busy busy working away and completed what I wanted to do.  Until!!! I realised I had made a HUGE mistake and it was going to take me some time to undo it and fix it up.

So .... with that in mind ... I put the sewing down and entered the kitchen.  First, however, I want to show you the beginnings of my vegie garden.  Now, seeing as I don't have a vegie 'patch'' as such, I have planted my zuchini's in pots to get them started.


something tells me I'm going to have zuchini's coming out of my ears ....


I got so carried away, I didn't realise how many I had actually planted LOL

I also plated some tomato plants -- I want to make some chutneys and spreads with them!


not completely sure I need that many tomato plants ..... however, I will march on and find them all a purpose.  I promise to keep you posted on their development and who know's what I may make with them.  All to come soon!!

All my babies are doing well!!!
moving on ...

speaking of babies, I had to take a pic of my darling boy on my way to the kitchen


dreaming of mice and cheese no doubt!!!


Ok .. so into the kitchen we go.  And I decided to make a decadent chocolate mud cake.  Even the mix was delightful ... and yes, I had to lick the bowl.


In that little blue bowl is the most delicious blend of chocolate, butter, coffee, water and sugar.  I had to get it into the tin to stop myself eating it lol

and the result of that mouth watering cake mix ....


one of the most scrumptious chocolate cakes i've ever tasted!!!

The receipe is as follows:

250g unsalted butter, chopped
200g Cadbury milk cooking chocolate, chopped
1 tablespoon Instant coffee powder
1 1/2 cups boiling water
1 3/4 cups Castor sugar
2 eggs, lightly beaten
1 1/2 cups Self-raising flour, sifted
1/2 cup Cadbury Bournville Cocoa


Preheat your oven to 160 degrees celcius (conventional oven) 140 degrees celcius (fan forced).  Grease and line the base of a 28cm cake pan.  Combine butter and chocolate in a bowl over a saucepan of simmering water and melt over low heat.    Dissolve coffee in boiling water, and add with sugar to chocolate mixture and stir to dissolve sugar.
Transfer to a bowl and allow to cool for 10 minutes. (I let mine cool a bit longer than this)  Using an electric mixer gradually add eggs., (I dont have an electric mixer, so just beat it by hand with whisk and worked fine) then flour and cocoa.  Mix for another 2 minutes or until evenly combined.  Pour into cake pan and bake for 1 - 1 1/4 hours.  (I found one hour to be sufficient).  Once cooked test with skewer and allow to cook in tin for 30 minutes before turning out.  Enjoy!!


But I couldn't stop there, for dinner I cooked up a Thai-flavoured Chicken mince in lettuce cups --- my tastebuds were doing cartwheels over this one.

receipe is:

2 teaspoons olive oil
1 large red onion, thinly sliced
750g chicken mince
1 bunch coriander
1/4 cup sweet chilli sauce
2 tablespoons fish sauce
2 tablespoons lemon juice
3 teaspoons brown sugar
small lettuce cups


Heat the oil in a fry pan over medium heat.  Add the onion.  Cook, stirring occasionally for three minutes or until the onion is soft.  Add mince. Cook, (use a wooden spoon to break up the mince) for 10 minutes or until browned.

Meanwhile, cut roots of coriander and discard.  Finely chop up bunch of coriander. Add chopped coriander to mince with sweet chilli, fish sauce, lemon juice and sugar.  Stir to combine and simmer for 5 minutes, stirring occasionally.

Place a couple of spoonfuls into your lettuce cups, wrap and eat.

This is the most delicious meal and its so incredibly quick and easy to make.  My daughter absolutely love it!!

and finally ... all washed down with an amazing light display


it's been a while since we have had such a beautiful sunset. What a way to finish my day!

till next time ...........


Friday, February 18, 2011

Animal Magic

Where would I be without the special man in my life ...my cat Jasper. 

He's my yin of the yang ... the crystal that keeps me feeling balanced.  Jasper chose me when I visited an animal shelter looking for a new baby 3 years ago.  Your typical cute kitten ... a little orange and white ball of fluff that captured me as soon as I held him --- I was unable to put him down and I didn't until we reached our front door.  With blue eyes (yes blue) and a quirky tail that stood straight up (until he learnt that he could actually bend it) he soon found his favourite spot --- on my shoulder.  He looked exactly like the ginger kitten you see on the front of the cat food box!

he stole my heart .... 


To this day he continues to keep me calm in his presence ... he live's up to his name ... 'Jasper'.


My special boy!

Tuesday, February 15, 2011

Just Snuggly

Well look what my mummy made for me.

 These beauties are going to keep my so nice and snuggle in winter.  They are 75% merino and 25% nylon for wearability. Seeing as she is a master knitter, she let me chose whatever pattern I wanted.  I love the colours!!!!


I went for a Celtic knot at the front from toe to top.


and on the back ...


If anyone is interested in knitting themselves a pair, I'm sure I can get hold of the pattern for you.  Just drop me an email.


Happy Knitting  


Monday, February 14, 2011

All things nice ...

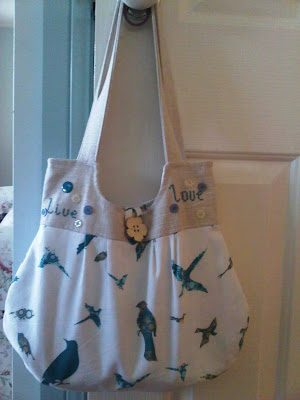
After spending months of making bags for Christmas pressies, I decided it was time to make a little something just for me.  This blue would have to be one of my favourite colours.  It's so calming and the birds give it a sense of freedom.  

I also decided to make the top section a little unique to me.  I have a jar of buttons that i've collected from Thift shops around our local area, so I picked out some pretty blue, clear and opaque that go nicely together.  I also dragged out some embroidery thread in a nice teal and stitched a couple of words that are real to me "live" and "love".  Firstly though I drew out my cross stitch wording on a spare piece of paper to make sure the letters all worked together.  Then I set to work stitching.  I also wanted a very natural look to this bag, so I used linen, which worked perfectly for my cross stitched lettering.  Once my lettering was complete, I hot glued my buttons in place and added my large decorative button.


And Hey Presto .... my own special bag!!


My Hub of Creation!

Seeing as this is my sewing and craft blog I thought it might be a nice idea to share my little sewing corner.  At the moment, due to a slight lack of space my set up is in our garage.  This is soon to be remedied in a few months when I move into my own home.  I can't wait to design my layout, add some cabinets and get my things up on the walls.  Not to mention the excitement of creating for my own home .... yeeeee :)  A whole room dedicated to sewing .... YAY


as you can see I have timber resting on a stool and a crate to make a table.  It works well .... just not too much throtal or you bounce your way through your stitching LOL
this is where I do all my cutting, pinning, drawing, designing .... and thinking of course lol.  I did have my machine here, but I was in dire need of a cutting table.  Hence the timber on the stool and toy crate now holding my machine.


the full spectrum .... it's not huge, but it works.  The only difficulty I have found is it can tend to get too dusty in the garage to work long periods of time.  And that is when I take over the dining room LOL.  The joys of allergies.

Well, I hope you enjoyed seeing someone elses sewing space and have a wonderful day.